Sony BRAVIA™ Professional Displays
ℹ️ This is information for setting up and using equipment for PinToMind, for Sony BRAVIA™ Professional Displays, with Android 9.0 and newer.
Although we have a guide, it is not necessarily a recommendation. Find information about equipment we recommend, on our website.
❗️ NOTE! Sony BRAVIA™ Professional Displays does not support portrait (vertical) display.
CONTENT IN THIS ARTICLE
- Installation of PinToMind Player
- Change the language of the screen
- Automatic Start, Regular Restart, Always On and Source Selection
- Restricted Access - if the screen is not going to be used for multiple purposes
- Pin code for Pro Mode settings
- Pro Mode - explanation of the different modes, and how to switch between them
- Manual Update of the PinToMind Player app
- Reset the screen to Factory Settings
Installation of PinToMind Player
- Follow the startup instructions for your Android device and sign in with your Google account.
- Open Google Play Store and search for "PinToMind Player". If Norwegian is chosen as language on the Android-device, the app will be called "Infoskjermen Player", and if it has English as language the app will be called "PinToMind Player". It is the exact same app.
- Install the app.
-
Open PinToMind Player. The screen displays a unique code.
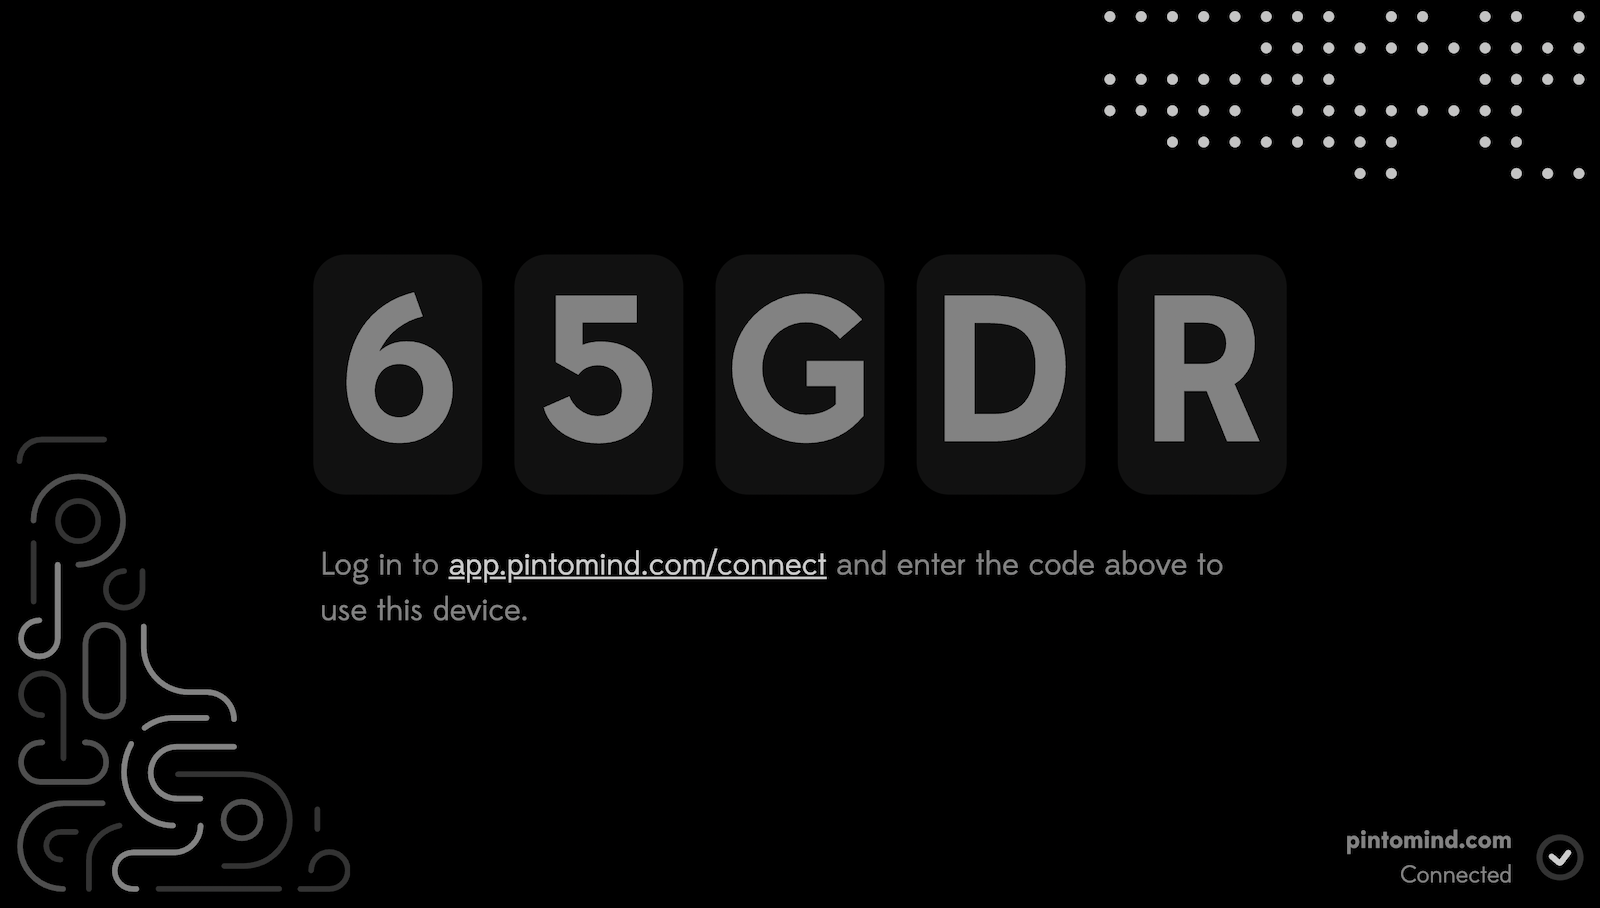
Example code. NB: Your screen will display a unique code. -
a. If you use PinToMind 3: On another computer or mobile: Log in to your PinToMind-account. Go to "Screens" in the left menu and select "+ CONNECT A NEW SCREEN".
b. If you use PinToMind Classic: On another computer or mobile: Log in to your PinToMind-account in https://app.pintomind.com/connect.
- Enter the code now displayed on the screen to connect the device to your account.
- Choose which screen (PinToMind Classic) or channel (PinToMind 3) should be displayed on this.You can change which screen or channel is displayed on this device at any time.
- The channel/screen you selected now starts displaying on your device.
Thats it! PinToMind Player is now installed and the device is ready for use.
Screens from Sony that support Pro Mode can be set to start automatically with PinToMind Player on selected days and times. See instructions for this below.
Change the language of the screen
🇬🇧 We use English on our devices and explanations. If the language of your screen is set to a different language, you can change it to English (UK) under ⚙️(Settings) - System - Language.
(On some Sony-models, select: ⚙️(Settings) - Device settings - System - Language).
Automatic Start, Regular Restart, Always On and Source Selection
ℹ️ You will find a guide for how to change between the different modes (Pro mode, Pro settings mode and Normal mode) further down in this article.
Sony-screens that support Pro mode can be set up to automatisk start with PinToMind Player on selected days and times:
1. In order to set this up, you first have to switch to Pro Settings Mode.
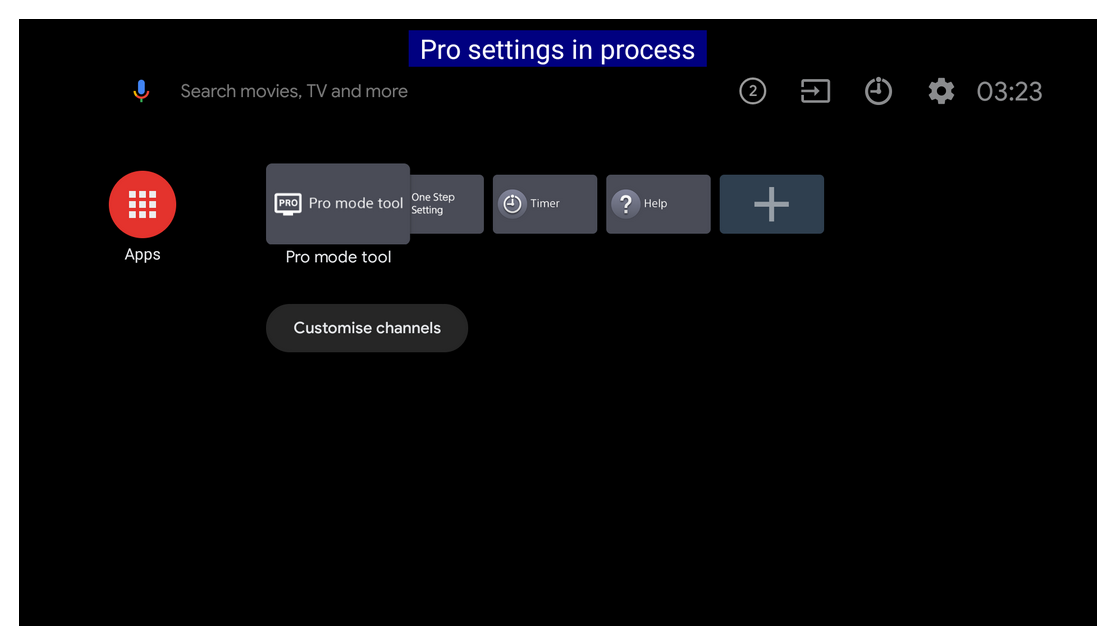
In Normal mode, switch to Pro settings mode by clicking on [HOME] on the remote control and selecting Apps - Pro mode tool - Pro settings mode - OK.
(On some Sony-models: switch to Pro settings mode by pressing the following buttons on the remote control, in the following order;Info -> Mute -> Volume up -> Home You may need to press a few times before the screen responds to the command.)
A blue line appears at the top of the screen when Pro settings mode is active.
2. On the remote, click [HOME], and go with the arrows on the remote to ⚙️ Settings.
3. Select; ⚙️ Settings - Pro settings - Power Scheduling. Select the times and days your want.
4. If the screen is to be on 24/7, we recommend a regular restart, preferably once a day.This can be set by selecting: ⚙️Settings - Pro settings - Periodic restart. Set the desired times and days and select Forced restart while display is on. If the screen is not going to run 24/7 the Periodic Restart can be Off.
5. To ensure that the screen starts after a possible power failure and that PinToMind Player starts as the selected "source", the following is done;Select; ⚙️ Settings - Pro settings -Initial input source - Android app. Scroll down the list and select PinToMind Player. Press up again and select OK.Select; ⚙️ Settings - Pro settings - AC power on. Change to Always On.
💡 TIPS:
- Disable the Timer(s) and One Step setting menu bars located on the home screen. These can be confusing and override any time management.
- On Sony models from Android 10: Select Apps - One Step Setting - Signage use to use the screen only for info screen/signage use.
- See also Sony's own pages on installing and using Pro mode. Here are several videos that show the individual features.
Restricted Access - if the screen is not going to be used for multiple purposes
Sony BRAVIA™ Professional Displays can install apps from Google Play and can be used for several purposes. If your screen is going to be only used as an information screen we recommend deactivating access to other features and apps.
On the remote control, click [HOME], and go with arrows on the remote to ⚙️ Settings.
Apps
Select; ⚙️ Settings - Pro settings - Apps.
In the list of installed apps, select Enable for PinToMind Player, and for the remaining apps not to be used: Disable.
Sources
Select; ⚙️ Settings - Pro settings - External inputs.
Here you can deactivate ports that are not to be used by selecting Not use.
Screen sharing
Select; ⚙️ Settings - Pro settings - Screen mirroring.
Disable this if you do not want others to be able to share content to the screen over the network.
Pin code for Pro Mode settings
To prevent others from accessing the settings in Pro mode, you can activate a PIN code on the individual screen.
⚠️ NOTE: We only recommend this setting if the monitor is in an environment where abuse and vandalism may occur. The screen cannot be reset if the PIN code is forgotten.
- On the remote, click [HOME], and go with the arrows on the remote to ⚙️ Settings.
- Select; ⚙️ Settings - Pro settings - Pro mode lock.
- Select Enable.
Pro Mode - explanation of the different modes, and how to switch between them
The screen is set with three different modes;
- Pro mode - (recommended) operating mode, where Pro mode settings are used, but are hidden from the user.
- Pro settings mode - is the "administration mode" for access to set advanced settings. This mode is where you make the settings for Pro Mode.
- Normal mode - where the settings in Pro mode are hidden and the device works like another Android device. E.g. for regular use of several different apps and functions.
A blue line appears at the top of the screen when Pro settings mode is active.
Switch between the different modes
- In Normal mode, switch to Pro settings mode by selecting
Pro mode toolOn the remote control, press; [HOME] and select Apps - Pro mode tool - Pro settings mode(On some Sony models switch to Pro settings mode by pressing the following buttons on the remote control, in the following order;Info -> Mute -> Volume up -> HomeYou may need to press a few times before the screen responds to the command.) - I Pro Settings mode, switch to Pro mode (operating mode):On the remote control, press; [HOME] and select ⚙️ Settings - Pro settings - Start Pro mode - OK.(The screen turns black and restarts in Pro mode. First you see the start menu, and after a little while the screen starts PinToMind Player, if all the settings are done.)
- In Pro settings mode, switch to Normal mode by selecting
Pro mode toolOn the remote control, press; [HOME] and selectApps - Pro mode tool - Normal mode - In Pro mode, switch to Pro settings mode by pressing the following buttons on the remote control, in the following order;
Info -> Mute -> Volume up -> Home(You may need to press a few times before the screen responds to the command.)
Manual Update of the PinToMind Player app
On Sony, the apps are not updated automatically, so you have to update the app manually. (This is one of the reasons why we do not recommend Sony.)
- Go to Normal Mode.
- Select Apps.
- Open the Google Play Store app and select the icon at the very top right.
- Select "Manage Apps & Games" and "Updates".
- There you will find the apps that need updating, and you can choose "PinToMind Player" / "Infoskjermen Player".
Reset the screen to Factory Settings
Select; ⚙️ Settings - Device Preferences - Reset - Factory data reset - Erase everything